
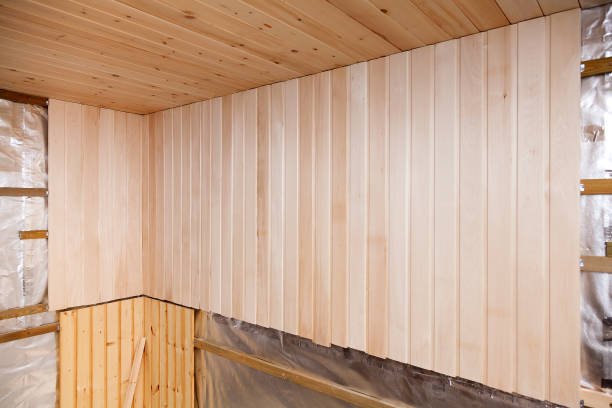
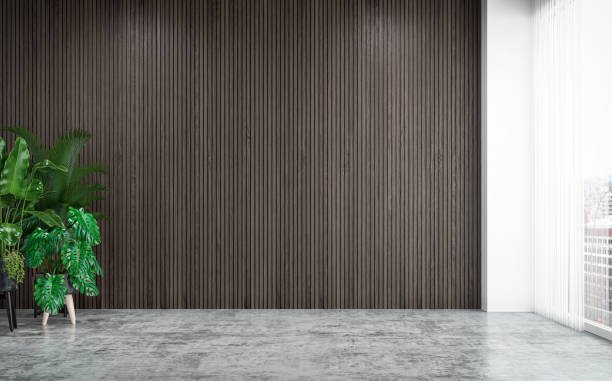
There’s no denying that wooden wall panels command attention, whether adorning walls or ceilings. Their natural beauty and timeless appeal can transform any space, adding warmth and character. Unlike many high-end interior design products that come with steep price tags and complicated installation processes, wooden wall panels offer a relatively budget-friendly and straightforward solution for enhancing your home.
In recent years, homeowners and designers alike have increasingly turned to wooden panels as a versatile option for renovations. These panels not only provide aesthetic value but also contribute to a cozy atmosphere that can elevate the overall ambiance of any room. Available in a variety of finishes, colors, and textures, wooden wall panels can easily complement different design styles, from rustic to modern chic.
Moreover, the ease of installation makes them an attractive choice for DIY enthusiasts. Many wooden panel systems come with interlocking designs that allow for quick and hassle-free setup. This means you can achieve a stunning transformation without the need for professional help, saving both time and money.
In this article, we will explore the benefits of wooden wall panels, discuss the various types available, and provide tips for selecting the perfect panels to match your design vision. Whether you’re looking to refresh a single room or make a bold statement throughout your home, wooden wall panels offer an exceptional way to achieve your interior design goals.
Best Surfaces for Installing Wood Paneling

Wood paneling is a versatile choice that can be applied to various surfaces, not just flat walls. Whether for residential or commercial spaces, this material adds warmth and character to your design. Here are some suitable surfaces for installing wood paneling:
- Wood Boards: A classic option that blends seamlessly into natural-themed spaces.
- Brick: Provides a sturdy foundation and is ideal for industrial-style decor.
- Tile: While less common, it can create a unique visual effect.
- Drywall: This is one of the most commonly used wall materials, fitting for most homes.
- Lath and Plaster: Offers textural variation and enhances decorative layers.
- Cement Board: Perfect for modern and minimalist styles, delivering a clean, sleek appearance.
- Plywood: Lightweight and easy to handle, suitable for DIY projects.
Before installing wood paneling, ensuring the condition of the underlying material is crucial. Regardless of the surface you choose, inspect for any damaged drywall, loose tiles, or other issues. If you identify any defects, make sure to repair them before installation to ensure the wood paneling can be securely and safely affixed.
The installation process for wood paneling is typically straightforward, allowing you to achieve your desired look without excessive time, money, or effort. You can choose to use adhesive or screws based on the product and personal preference. Once you’ve decided on the installation method, you can begin the process.
While each series of panels may have specific installation requirements, the basic tools you’ll need typically include:
- Tape Measure: To measure the required length of panels and the wall dimensions.
- Pencil: For marking cut lines and installation locations.
- Level: To ensure the panels are installed straight, avoiding any unevenness or tilting.
- No-More-Nails Construction Adhesive and Gun: For securely adhering panels to the wall, suitable for those who prefer not to use nails.
- Precision Drill Bits: For drilling into harder materials.
- Hammer and 2-Inch Finishing Nails or Pneumatic Nail Gun: For fastening the panels using nails or staples.
- Screwdriver and 2-Inch Finishing Screws: For securely fastening panels if screws are chosen as the method.
- Power Saw or Jigsaw: For cutting panels to perfectly fit the wall dimensions.
By following these preparation steps, you can successfully install wood paneling and enhance the aesthetics and functionality of your indoor space. Regardless of the surface chosen, ensure each step is carefully executed to achieve a satisfying final result.
How to Install Wood Paneling on Your Walls
Installing wood paneling on your walls is a straightforward process that can greatly enhance the aesthetic appeal of your space. Follow these steps to achieve a beautiful and durable wall decoration.
Step 1: Prepare the Walls
Before you begin the installation, ensure that your walls are in good condition. Remove all nails, decorations, and baseboards to clear the area. Make sure there are no damaged items that you plan to reuse. Additionally, clean the wall surface to remove dust and grease, as this will help the adhesive bond better.
Step 2: Measure the Walls
Accurate measurements are crucial for a successful installation. Start by using a tape measure to determine the width and height of the walls. Multiply the width by the height to get the total square footage. Be sure to account for any doors or windows when calculating the area that needs to be covered. Use the width of the panels to determine how many pieces you’ll need to purchase, ensuring you have enough material on hand.
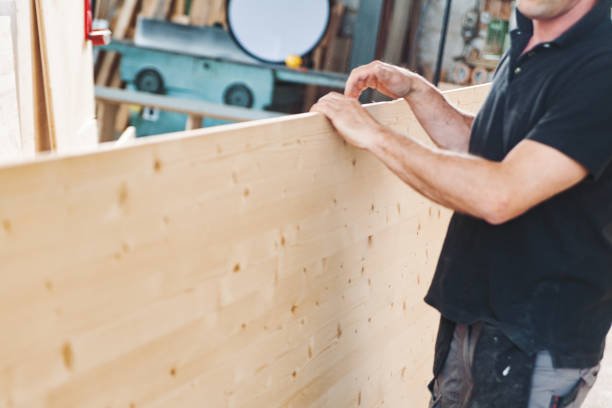
Step 3: Install the Panels
Since most walls are not perfectly straight, it’s important to check the level of the first panel using a level tool. Once you’ve determined the placement of the first panel, you may need to trim panels to fit around doors and windows. A fine-toothed saw is ideal for cutting the panels, as it helps prevent sharp edges that could pose a safety hazard.
Step 4: Apply Adhesive to the Wall
For adhering the panels, using construction adhesive or grab adhesive is recommended. Before applying, double-check that all openings are aligned and that cuts are accurate. Using a caulking gun, apply the adhesive in a zigzag pattern on the back of the panel. Ensure even coverage for optimal adhesion. Carefully press the panel against the wall, making sure it adheres fully. For added stability, you can gently tap the edges of the panel with a rubber mallet.
It’s best to complete an entire row or column before moving on to the next. This approach helps ensure alignment and stability, minimizing any unnecessary deviations.
By following these steps, you can successfully install wood paneling on your walls, enhancing both the beauty and comfort of your interior space. Throughout the process, maintaining attention to detail and patience will help ensure a satisfying final result. Whether you’re a professional or a DIY enthusiast, these simple steps will guide you through the project, allowing you to enjoy the charm of your newly decorated space.
How to Secure Wood Panels to Walls with Screws
Securing wood panels to walls is a reliable method for achieving a polished and professional finish. Here’s a step-by-step guide to help you navigate the process smoothly.
Step 1: Prepare the Wall Surface
Before you start installing wood panels, it’s essential to ensure that the wall surface is clean and even. This preparation helps prevent any bumps or unevenness in the final appearance. Begin by sanding down any rough patches and removing any existing nails, screws, or obstructions on the wall. A smooth surface allows for better adhesion and a more secure installation.
Step 2: Install Baseboards (for Acoustic Panels)
If you’re working with acoustic panels, it’s crucial to install furring strips first. These strips will serve as a sturdy foundation for securing your panels with screws. Depending on the type of wall you are attaching them to, you may need to use screws and wall anchors to ensure a strong hold. For optimal acoustic performance, consider inserting soundproofing material between the furring strips. This step will significantly enhance the sound insulation of your space.
Step 3: Cut Panel to Length
Often, the wood panels may not perfectly fit the height of your wall. To achieve a precise fit, you may need to trim them to the appropriate length. Use a pencil to mark your cutting line clearly, then carefully cut along this line using a saw. Take your time to ensure clean edges, as this will contribute to the overall aesthetic of your installation.
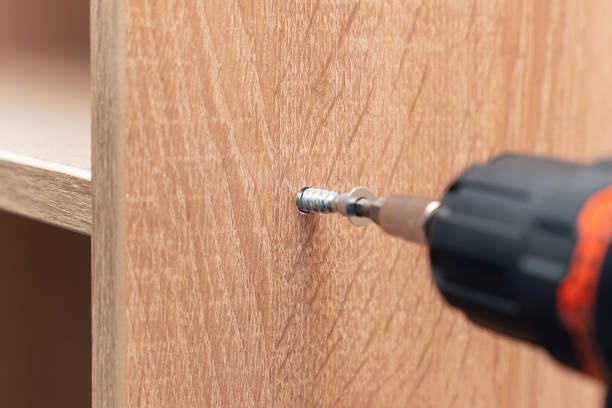
Step 4: Install the Panels
With your panels cut to the desired length, you can begin the installation process. If you’re working with acoustic panels, take the appropriate screws and insert them through the panel into the furring strips. Ensure that each screw is securely fastened to provide a solid hold. If you are not using furring strips, simply use the screws provided with the panel to attach it directly to the wall. Make sure to drill the screws straight to avoid damaging the panel or wall.
How to Secure Panels to Furring Strips
Attaching panels to furring strips follows a similar process to screwing them directly into the wall but includes a few key differences. Ensure that the furring strips are level and evenly spaced to provide a stable base for your panels. When inserting screws, be cautious not to over-tighten, as this can cause the panels to crack or warp.
By following these detailed steps, you can effectively secure wood panels to your walls, enhancing the beauty and functionality of your space. Paying attention to preparation and installation techniques will ensure a high-quality finish that you can be proud of. Whether you’re a seasoned DIY enthusiast or a first-time installer, these guidelines will help you achieve professional results with your wood paneling project.
How to Secure Wood Panels to Furring Strips
Attaching wood panels to furring strips is a straightforward process that shares similarities with securing them directly to walls, but there are a few key differences to ensure a secure and professional finish. Follow these detailed steps to achieve optimal results.
Step 1: Prepare the Furring Strips
Begin by ensuring that the furring strips are smooth and even. Sand down any rough spots to facilitate a better fit for the panels. Remove any existing screws or nails that might interfere with the installation. A well-prepared surface ensures that your panels will sit flush against the wall, creating a clean and attractive appearance.
Step 2: Drill Screw Holes
Before installing the panels, you’ll need to pre-drill appropriate-sized holes in the furring strips. This step is crucial for allowing the screws to pass easily through the panels and into the strips. Measure the dimensions of your panels and mark the drilling points on both the panels and the furring strips. Ensure that the marks align perfectly to facilitate accurate installation. Using a drill bit that matches the diameter of your screws will help prevent splitting the wood.
Step 3: Secure the Panels to the Furring Strips
Once you have drilled the necessary holes in the panels, you can begin the installation. Place the panel against the wall, ensuring that it is aligned correctly. If your furring strips are not anchored to the wall with wall anchors, insert wall plugs where necessary for added stability. It can be helpful to have a second person hold the panel in place while you align the holes.
Insert screws through the pre-drilled holes in the panel into the furring strips. Use screws that are long enough to penetrate through the panel and securely grip the strip without protruding excessively. Tighten each screw, but avoid over-tightening, as this could lead to panel warping or cracking.
Final Tips
- Use a Level: Before securing the panel, check that it is level. This will ensure that your installation is visually appealing and structurally sound.
- Minimal Holes: Typically, you only need to drill 2 to 3 holes for each panel, depending on the size. This minimizes visible hardware while still providing adequate support.
- Choose the Right Screws: Using screws that are designed for wood will help you achieve a strong hold without damaging the materials.
By following these steps, you can effectively secure wood panels to furring strips, enhancing both the aesthetics and functionality of your space. Attention to detail during preparation and installation will yield a professional finish that you can be proud of. Whether you’re a DIY enthusiast or a seasoned professional, this method provides a reliable approach to achieving beautiful wood paneling.
How to Cut Wood Wall Panels
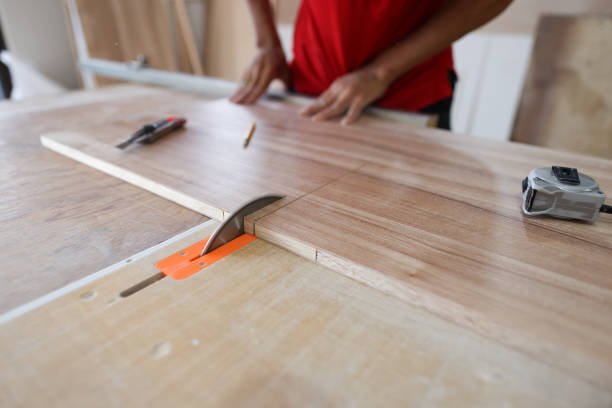
Cutting wood wall panels requires the right tools and techniques to achieve clean, accurate results. Here are several effective methods for trimming panels to your desired length, ensuring a professional finish.
1. Circular Saw
A circular saw is an excellent choice for making rough cuts on multiple panels quickly and efficiently. Here’s how to use it:
- Preparation: Ensure that the circular saw is equipped with a fine-toothed blade, as this will help produce smoother cuts.
- Setup: Place two 2×4 pieces of wood parallel on the floor, spaced about three feet apart. Lay the panel face down on top of the wood supports.
- Measurement: Double-check your measurements before cutting. Use a straight edge or a cutting guide to mark the desired cut line on the panel.
- Clamping: Secure the cutting guide at both ends with clamps to ensure it doesn’t move during the cut.
- Cutting: Position the saw against the guide and run it along the marked line. This method provides straight, uniform cuts and helps minimize chipping.
2. Handsaw
For smaller jobs, such as cutting out openings for electrical outlets or light switches, a handsaw can be an effective tool.
- Setup: Place the panel face up on a pair of sawhorses or a stable work surface.
- Measurement: Mark the area you need to cut, ensuring your measurements are accurate.
- Cutting Technique: Start cutting slowly and apply steady pressure to avoid splintering the wood. Handsaws provide more control for intricate cuts but require more physical effort compared to power tools.
3. Jigsaw
A jigsaw equipped with a fine-toothed blade is perfect for detailed work and precise cuts, particularly for curves or notches.
- Preparation: Draw a cutting line on the panel where you intend to cut.
- Clamping: Secure two guides on either side of the marked line to help maintain a straight cut.
- Cutting: Slowly guide the jigsaw along the cutting line. Jigsaws are versatile but can be tricky to handle for straight cuts, so take your time to ensure accuracy.
Additional Tips for Successful Cutting
- Measure Twice, Cut Once: Always double-check your measurements before making any cuts. This simple rule can save time and materials.
- Use Protective Gear: When working with saws, always wear safety goggles and a dust mask to protect yourself from wood particles and debris.
- Practice on Scraps: If you’re unsure about a cut, practice on a scrap piece of wood first to get a feel for the tool and technique.
Cutting wood wall panels can be a straightforward process if you use the right tools and methods. Whether you opt for a circular saw, handsaw, or jigsaw, each tool has its unique advantages. By following these guidelines and paying attention to detail, you can achieve clean, professional results in your woodworking projects.
How to Install Wall Panels Around Outlets, Windows, and Fixtures

Installing wood wall panels around outlets, windows, and fixtures can be challenging due to the need for precise cuts that align perfectly with these features. Here’s a detailed guide to help you navigate this process smoothly and achieve a professional finish.
Installing Around Outlets and Fixtures
- Mark the Area: Begin by using chalk to outline the area on the wall where the outlet or fixture is located. This provides a visual reference for the cutting process.
- Position the Panel: Place the loose panel over the marked area, ensuring it covers the outline completely. This allows you to clearly see where you need to make your cuts.
- Create Cutouts:
- Drill a hole in the corners of the outlined area. This will help guide your saw and prevent the panel from splitting.
- Use a jigsaw or a similar cutting tool to carefully cut along the marked outline. Aim to extend the cut by approximately 0.74 inches to ensure a proper fit around the outlet or fixture.
- Test Fit: Once you’ve made the cut, test the panel’s fit around the outlet or fixture. Make any necessary adjustments for a snug fit.
Installing Around Windows and Doors
The process for installing panels around windows and doors is slightly different, as it requires a more measured approach:
- Measure the Area: Accurately measure the dimensions surrounding the window or door frame. This ensures you have the correct size before cutting.
- Mark the Panel: Transfer these measurements to the back of the panel. Mark out the same dimensions you measured on the wall.
- Extend the Cut: Similar to the outlet method, extend your cut by about 0.74 inches beyond the required dimensions. This extra space will allow the panel to fit comfortably against the frame.
- Cutting Technique:
- When cutting, use a utility knife or handsaw from the back of the panel. This helps maintain a clean edge and prevents any roughness on the visible side.
- For more complex shapes, consider using a pencil compass to outline the desired cut before employing a jigsaw for accuracy.
- Leave a Small Gap: For optimal installation, it’s advisable to leave a small gap of around 0.06 inches between the panel and the frame. This allows for slight expansions or contractions of the material over time.
Special Considerations for Electrical Outlets
- Adjusting for Recessed Outlets: If your outlets are recessed, remove the panel, mark the position of the recessed outlet on the back, and use a jigsaw to create a corresponding cutout. This will ensure that your panels fit seamlessly around the outlets.
- Installing Switches and Plugs: For light switches and power plugs, you can similarly mark the recessed areas. Cut around these fixtures carefully to ensure they sit flush against the wall panel.
Installing wood wall panels around outlets, windows, and fixtures requires careful planning and precision. By following these steps, you can achieve a seamless and professional look in your space. Remember to take your time with measurements and cuts, ensuring everything fits perfectly for a polished finish. With the right approach, you’ll transform your walls into stunning features that enhance the overall aesthetic of your home.
Expert Guidance on Premium Wall Panels
Are you in search of wall panels that beautifully blend elegance, durability, and affordability? Look no further! With over 40 years of experience in providing high-quality luxury wood products, we are your go-to source for exquisite wall paneling solutions.
Why Choose Our Wall Panels?
- Exceptional Quality: Our wood panels are crafted from the finest materials, ensuring not only an elegant appearance but also long-lasting durability. Each panel is designed to withstand the test of time, maintaining its beauty even in the most demanding environments.
- Diverse Selection: We offer a wide variety of colors and styles to suit any aesthetic preference. Whether you’re aiming for a classic, modern, or rustic look, our collection has something to complement your home’s design perfectly.
- Affordable Luxury: Our commitment to providing value means you can achieve the luxurious look you desire without breaking the bank. We believe that high-quality design should be accessible to everyone, and our pricing reflects that philosophy.
- Expert Support: Our team of knowledgeable professionals is here to guide you through every step of the selection and installation process. From choosing the right style for your space to offering tips on maintenance, we’re dedicated to ensuring your complete satisfaction.
- Sustainability: We prioritize eco-friendly practices in our sourcing and manufacturing processes. Our wood is responsibly sourced, and we strive to minimize our environmental impact, allowing you to make a choice that benefits both your home and the planet.
Transform Your Space
Our wall panels are not just products; they are a pathway to transforming your space into a sanctuary of style and comfort. Imagine the warmth of rich wood textures enveloping your living room or the sophistication of finely crafted panels enhancing your office environment.
With our expertise and extensive range of options, you can finally create the home you’ve always envisioned—one that reflects your unique taste and lifestyle.
Contact Us Today
Ready to elevate your interiors with our premium wood wall panels? Reach out to our team today, and let’s start the journey toward your dream home. Experience the perfect blend of elegance, durability, and affordability with our exceptional products!